What it AWS SQS:
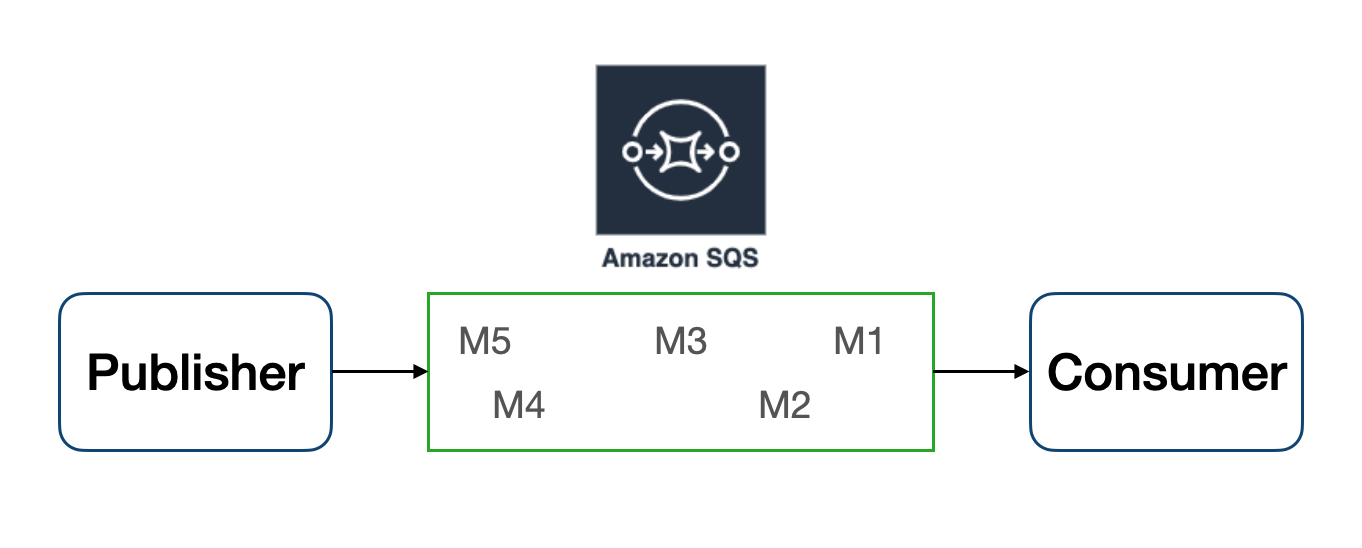
The Simple Queue Service from Amazon Web Services, or just SQS, is a managed queue service from AWS, capable of passing messages between applications and services.
With SQS it is possible to send and receive messages asynchronously and efficiently, without concern of storing generated and unread events.
The source of information for an SQS, that is, who can publish messages in it, can be a application running on an ECS, a Lambda function, or a SNS topic. In that last case, it is possible to create an inscription between the SQS and the SNS, in such a way that each message published in the SNS is automatically copied to the queue.
There are two types of queues:
- Standard: this type has higher message throughput, with at least one message delivery guaranteed and does not guarantee the order among the messages that have been published;
- FIFO: this type of queue has lower message throughput, but it delivers each message only once, guaranteeing the order in which it was published.
The choice between the two types of queue must take into account their advantages and disadvantages.
This article will introduce how to consume messages from AWS SQS,
using the
Java Message Service — JMS, in an application built with Spring Boot.
This article will introduce how to consume messages from AWS SQS, using the Java Message Service — JMS, in an application built with Spring Boot.
The JMS is an API that allows Java applications to send and receive messages from a messaging queue such as SQS. With JMS it's possible to abstract several actions that must be made to consume these SQS messages, such as the number of threads to keep reading the queue and also the behavior to be done when a new message arrives in that queue.
Configuring the Spring Boot with SQS:
The process of configuring the Spring Boot application to consume SQS messages with JMS consists of a few steps, which will be described below:
- Include the SQS and JMS libraries in the
build.gradlefile; - Add environment variables to the
application.propertiesfile; - Create the configuration class to define some behaviors.
The libraries that must be added to the project, in the build.gradle file, in the section dependencies , are shown below:
The first two are part of the Amazon Web Services SDK and are consecutively responsible for establish the SQS client and interact with the JMS, which is added to the project by the third library.
Regarding the environment variables, it is necessary to add the region in which the application is
running, as well as the name of the queues to be consumed by this application. This should
be done in the application.properties file, as seen below:
These variables will be used later in this article.
The interesting thing is to inject the value of these variables during the execution of the application. if the application is running on an ECS, this can be done in the variables section of container environment, within the task definition of the service running in ECS.
To configure JMS and SQS client, just create a class annotated with @Configuration
and @EnableJms as seen in the following class:
The first annotation will cause Spring Boot to create an instance of this class as soon as the application starts running. The second annotation enables JMS in the application.
Note that the aws.region variable is being used here. It will be useful for
configure the SQS client, as can be seen in the following method, which must be created
in that same class:
The first part of this method configures the factory of SQS client connections, related to the AWS region where the application is running, through the variable that was injected here, as well as where to find the credentials to access AWS resources. This one gives access, explaining in a simplistic way, the role that the application assumes when running on AWS.
The second part of this method configures the JMS, which receives the connection factory created in the first part, as well as other settings.
In this part of JMS settings, it is worth mentioning the following snippet:
factory.setConcurrency("2);
This instruction configures how many threads per queue will be used to consume the messages from that queue.
Consuming the SQS messages:
Now that everything has been configured for the application to consume SQS messages, it's time to consume them. This can be done by creating a class annotated with @Service,
as one can see in the following snippet:
Here the ObjectMapper is being injected, which can be useful for interpreting
messages in
JSON format arriving from the queue.
To consume the messages from the queue, inside this class, it is necessary to create an annotated method
with @JmsListener, having the destination parameter, with the value of the queue
to be consumed, which
in this case receives the value of the second environment variable:
This method must receive a parameter of type TextMessage, which inside others
attributes,
has the content of the received message in its text attribute.
If other queues have to be consumed by the same application, just add another method annotated with @JmsListener.
If you liked this content, follow me on LinkedIn, to receive notifications for other tutorials like this one!
Conclusion:
Notice how simple it is to configure a Spring Boot application to consume SQS messages, which is an excellent feature to establish asynchronous communication between microservices.
Reference:
This article was based on the concepts taught in this online course: Creating microservices in Java using AWS ECS and Fargate
Who am I:
- I worked daily with the technologies presented in this blog for almost 4 years, acting as a developer of solutions hosted on Amazon Web Services;
- I have been teaching cloud computing subjects, mainly AWS, in a post graduate course for almost 10 years;
- I have published books on the subject;
- I am part of the global community AWS Community Builder 2020/2021/2022, created by own AWS.